
H&W co-founders are stepping things up! Aimee Lagos and Christiana Coop, couldn't wait to try out our newly launched wallpaper borders collection designed by Nathalie Lete. They both selected Lune Borders for their projects, but used them in completely different ways. Aimee opted to upgrade her stair risers in a charming array of color while Christiana added some moody blues to her dining room ceiling beams.
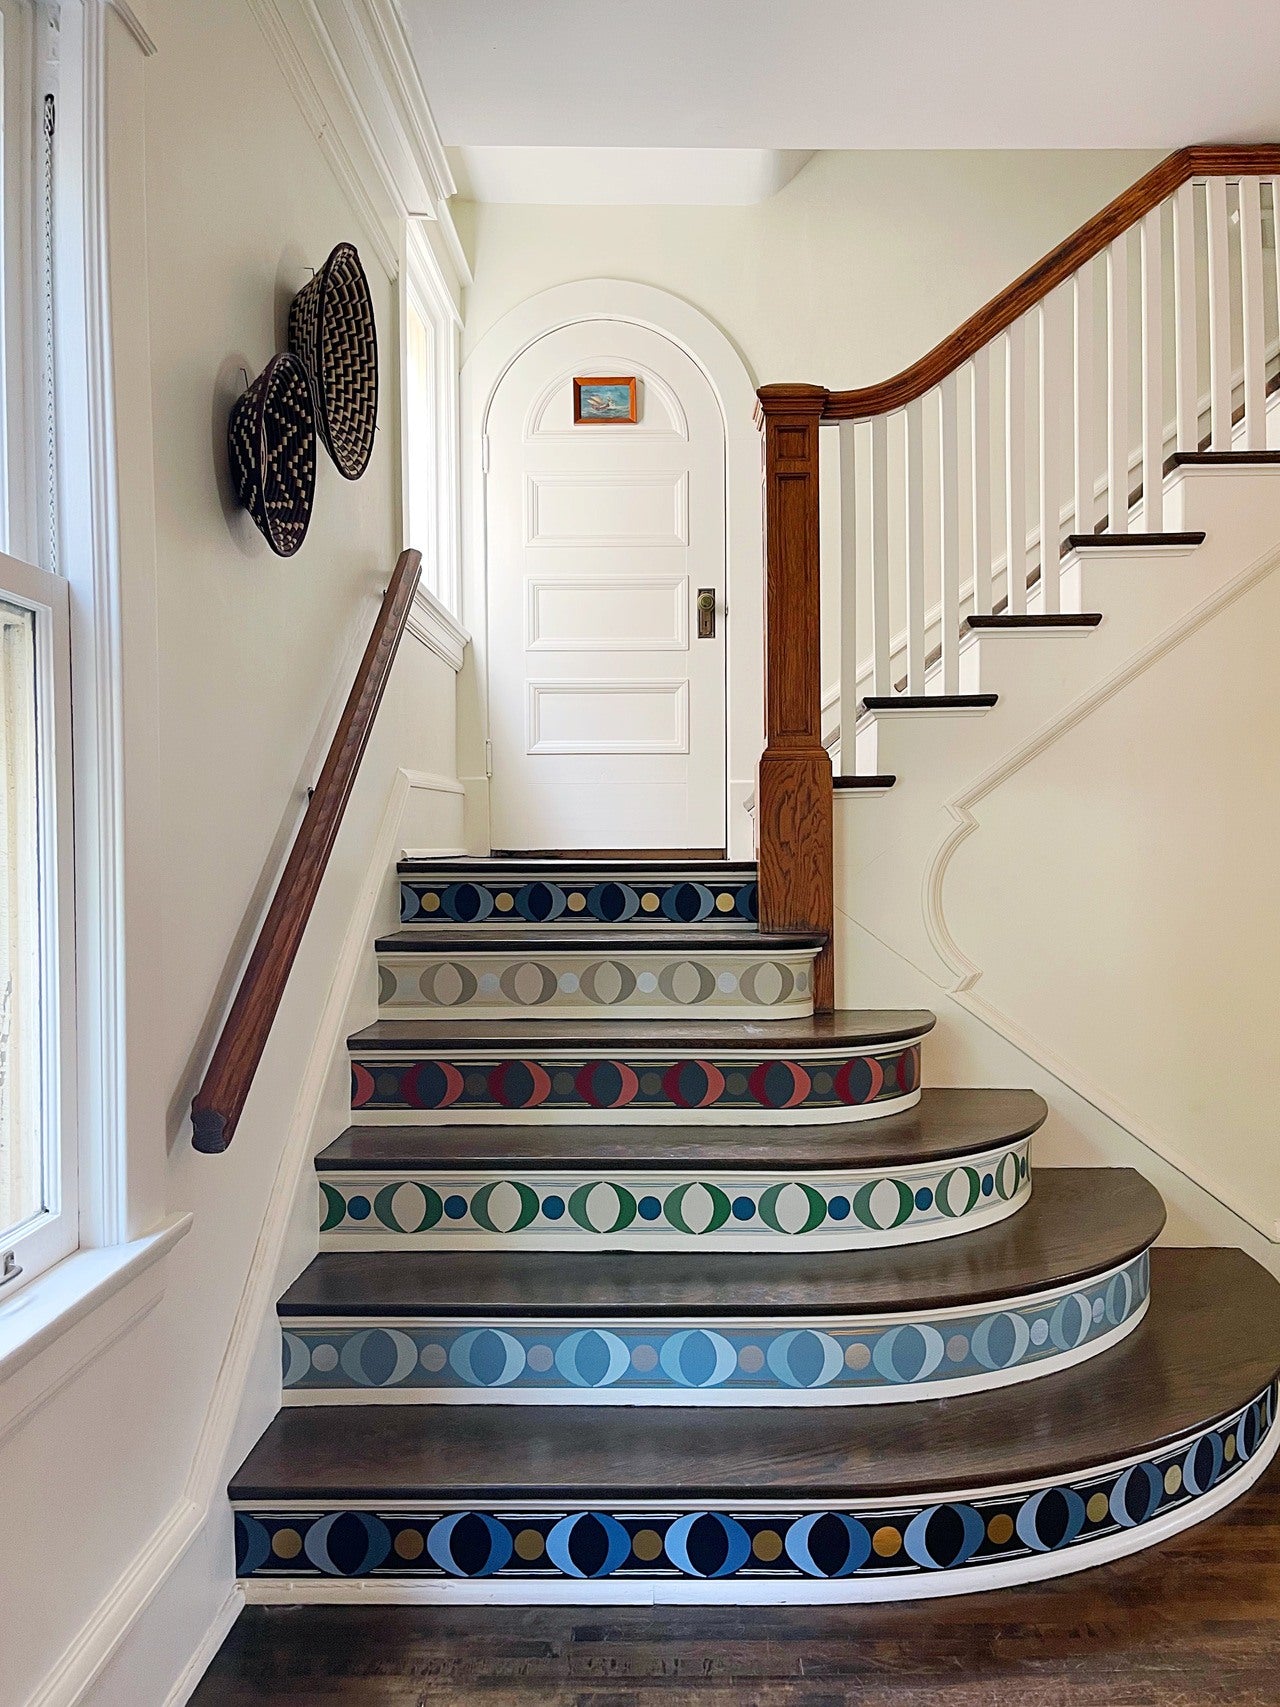
Aimee's Living Room Stairs
The project: "Our stairs are a focal point in our home, and one of the first things you see when you enter. I wanted to accentuate them and add some pattern to an otherwise pattern-less space. Always looking for an easy project, adding borders to stair risers appealed to me because it was much simpler than cutting panels of wallpaper to size. I used multiple colorways of the border to make even more of a design statement and because the rest of the room has a pretty streamlined palette, so it benefited from a big pop of color."

The installation: "The process was exactly the same as installing wallpaper, but much simpler. Once I'd determined the order I wanted them in and how I wanted them to "repeat" vertically (more on that below), I measured the stairs and cut them to size. Because they are small (4" tall), I just put a drop cloth on my dining room table and pasted them there. Once pasted, I let each border book for 5 minutes and then installed it on the riser. Smooth out the excess paste with a wall smoother, wipe it down with a damp rag, and trim - so easy! Because stairs are high traffic, I'm going to put a coat of decorator's varnish over the top of the wallpaper to protect them from scuffs or marks. More on that later..."

Aimee's top three tips for a successful border application:
- Forget everything you think you know about borders. They are not cheesy and they are not old fashioned. Borders are a fun way to add small amounts of pattern to a space and accentuate elements you love. Think about where you want to draw the eye in a space, and that's where you want to put a border.
- For the stair risers, it was important to figure out how I wanted the pattern to "repeat" vertically. Originally, I thought that I'd stagger them, but after I laid them out that way, I didn't like it. It also took a little shuffling to get them in an order that I thought worked well from a color standpoint. Take time to experiment before you commit.
- Be creative! I was thinking that it would have also been fun to make diagonal stripes with the borders on the stair risers if I had the time and/or patience for that sort of thing. When we were researching borders during the development of this collection, we saw a lot of really interesting border installations - everything from stacked stripes of borders on top of baseboards, trellis or grid patterns made from borders on accent walls, borders framing mirrors or windows. Personally I'd love to try them on a dresser or cabinet doors. The options are endless...

Christiana's Dining Room Beams
The project: "I have wood beams in my dining room that I thought would be perfect for the Lune (Ebony) wallpaper border. Because I love pattern but am limited by the wood paneled walls and ceiling, the borders were an obvious choice to add a little more interest to the space. I selected the dark colorway because I thought it would mix well with the wood and other elements in the room by not being too contrasting, and I love how the touch of muted gold reflects the sunshine differently throughout the day."


The installation: "Because I'm a renter, I decided to do a temporary installation that would be easily removable without damaging the wood. To do this I just outlined each wood panel section with blue painter's tape which will easily peel off the wood with no residue. I then put double stick tape over the painters tape and attached the wallpaper border to that. This technique works so well for a non-permanent application and is really quick and easy!"

Christiana's top three tips for a success border application:
- Choose the right color. It's really important to select the right color of border for your project, even more so than pattern. If the color is contrasting the wall, it will really stand out and draw the eye. This can be great if you're wanting to accent an architectural detail, but if you want the border to blend in with the other room elements then a closer color match would make more sense.
- What would Nathalie Lete do? Our borders were designed to mimic the artist's country home where she painted detailing around windows, doorways, and other small areas. When I think about where to apply a wallpaper border, I treat it like paint - where would I paint a little accent if I had the skills (which I don't)? That's where I'll border instead.
- Have fun! Borders are meant to release your design creativity and to create a unique, personality-filled space. Especially with the non-permanent technique, you can easily play around with borders on most any flat surface.